Since palm transpiration is very slow in the Winter, I suggest to do all your injections in Spring, Summer, and Fall. If you have the capability, you should water the palms the day before and after you do the injections.
*All applicators are responsible to check individual state regulations concerning products used.
Here is my step by step procedure to perform petiole injections:
Step 1: Read the label for the product you are using. Measure the palm or tree at chest level to determine the number of capsules you will need. If the number of capsules results in a fraction, round down to the lower whole number.
Step 2: Determine the fronds you will use for your Petiole Injection. Try not to use a browning or yellowing frond. Pre-drill the petioles, spacing your injections evenly around the palm.
Step 3: With a 11/64 inch drill bit as close to the base to the petiole as you can, drill a hole into the petiole base without coming through the other side. 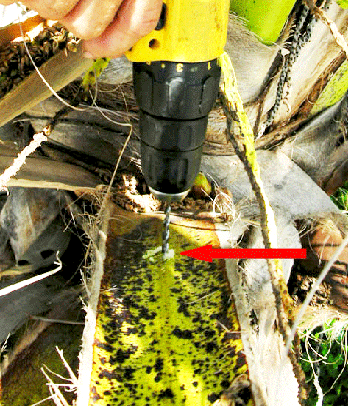 Do not reem out the hole (Do not increase the diameter of the chamber), but gently drill in and out of the chamber to remove the frass, so the chamber is clear. Drill the chamber at an angle to the petiole's stem so the feeder tube and capsule will be pointing downward to help drain the capsule fully. If you accidentally drill through the palm frond petiole, move the drill bit to the left or the right and re-drill using the same palm frond petiole. * Palms are treated quite differently from all other species. Palms (mono-cots) have vascular bundles throughout their petiole stem. By creating this chamber, in the petiole stem, you are allowing the chemical solution to be held as the bisected vascular bundles receive the chemical and translocate it through the palms natural transpiration process.
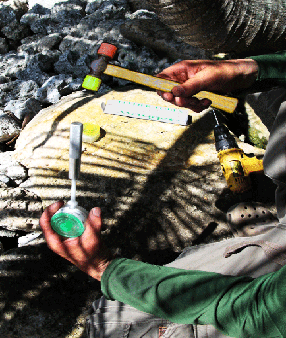
Step 4: Take the capsule you are going to use and put the feeder tube into it. Put the insertion tool in the end of the feeder tube, then gently tap the insertion tool with the mallet so you brake the seal of the capsule with the feeder tube stem. 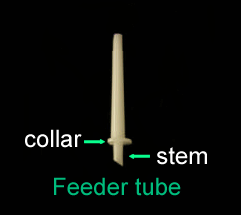
NOTE: The feeder tube should have the flat edge gun site in the up position. It is important that the feeder tube collar be flush with the capsule to make sure the feeder tube stem breaks the capsule's membrane.
Keep the feeder tube up right so the solution does not drip out and then gently rotate it as you are putting the tip into the pre-drill chamber hole and gently seat it using palm pressure. Seat it to a depth just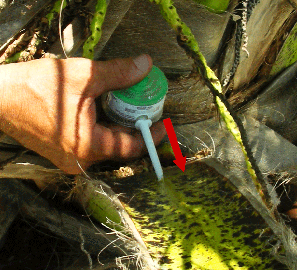 passed the indented tip on the feeder tube. Try not to jam the feeder tube into the Petiole chamber. If palms have spines in the petiole injection area they should be cut off (Phoenix species). They also have a much harder petiole tissue, so instead of seating the capsule with palm pressure, you may need to use your mallet to gently tap the back of the capsule to seat it into the palm petiole using the same feeder tube depth as mention above
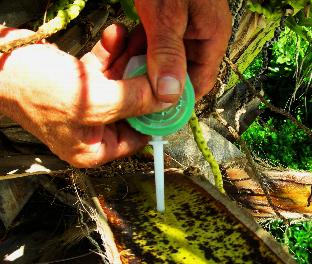
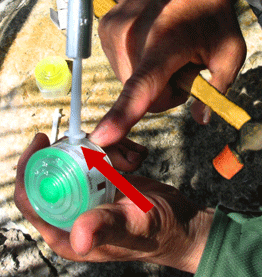
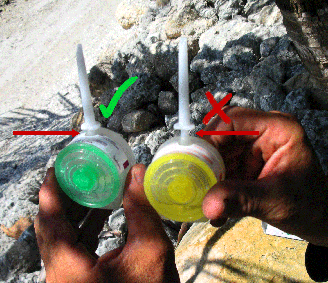
Step 5: Using your thumbs or a compression tool, compress the domed lid until you feel one or two clicks. The clicks signify the Versalock™ lid locking system is working. Thus releasing the contents into the feeder tube and the palm. * Note: You can rotate the capsule to make it easier for you to pressurize it, then rotate it back to the proper alignment.

(Note: you will actually see after you pressurize the domed lid, the solution being drawn into the palm petiole chamber, thus filling up the chamber and then come back up into the plastic feeder tube, creating a totally pressurized environment between the petiole, the feeder tube, and the capsule.)
Step 6: Move on to the next capsule and repeat steps above. when your are finished make sure you sterilize the drill bit before moving on to the next palm. * When applying two different products with two different injection holes and feeder tubes, DO NOT drill the holes in direct alignment above or below one another. Offset one product to the right or left of the first product applied. This is so you will apply the chemical to two different vascular bundle systems. DO NOT apply more than one different products at one injection time per palm petiole. DO NOT reuse a previous drilled hole for a new application.
REMOVAL AND DISPOSAL: It is important to note that the rate of drainage and the rate of uptake will vary depending on a number of things such as the species and health of the palm, the time of year, environmental conditions, and what you are injecting into the palm. *Palms in advanced stages of insect infestation and/or disease development, may not respond to treatment.
Turn capsule up side down, pull the feeder tube and capsule from the palm. Place them in a heavy duty plastic bag and follow instructions on the product label for disposal according to state and local guidelines.
Mark Steinberg 1- (941) 961-8705
Marksteinberg@botanicalsolutionsllc.com